Supervisor only reviews, allow for a review to be run whereby the supervisor of a team can review the performance of their team members, without the employee needing to rate their own performance.
The first stage in any performance review, is the configuration, scheduling and targeting of the review by either the HR team or administrator.
Performance reviews can be configured in a number of ways and by using target groups, can be set for certain teams or individuals.
Before configuring a review, if the goals section is to be included, please be aware that this will use existing employee goals, as well as company values. Goals – how to add, edit and delete, as well as adding/editing company values are explained in greater detail in the related articles at the bottom of this page.
If the goals section is included, but there are employees that haven’t had goals set, this will initially result in a blank goals section at the start of the review. A manager can however, add new goals at the end of this review, if you include the next goals section. Goals are locked during the review process and cannot be amended during this time.
The guide below will take you through configuring a review, how target groups are used and the scheduling process behind a review.
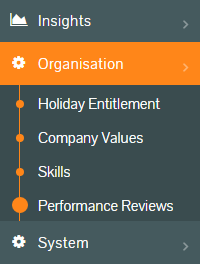
Accessing Review Configurations
- Logged in as an administrator, click on the Organisation side menu, followed by the Performance Reviews sub-menu or the Reviews – Manage reviews dashboard panel.
Performance -> Admin side menu

Reviews – Manager Reviews dashboard panel
- The Performance Reviews table is displayed and shows any current or previous performance reviews.
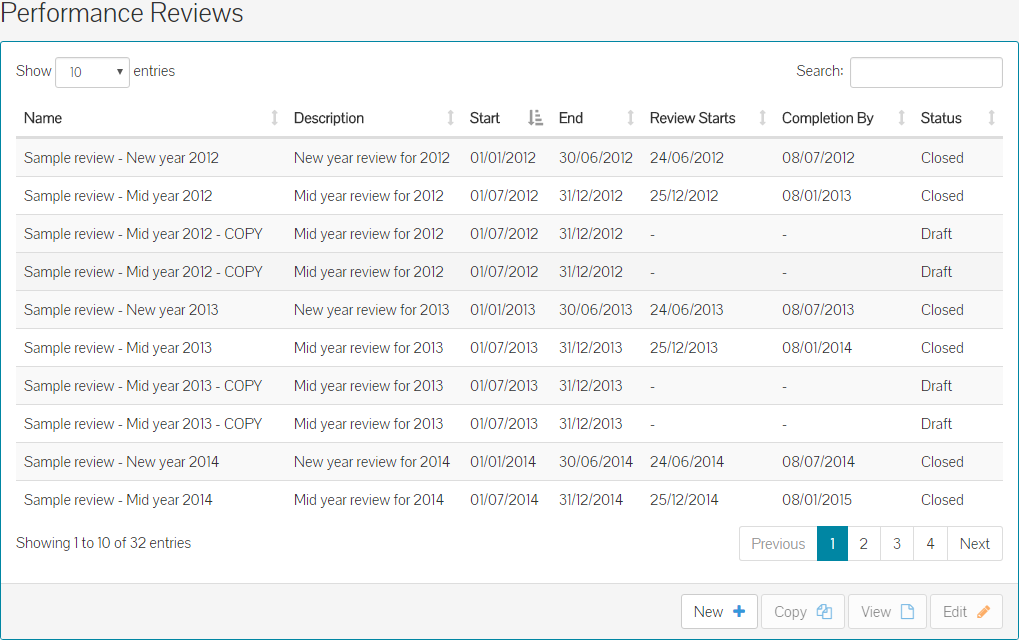
- This contains reviews in all statuses, such as draft, scheduled, in progress or closed. It also shows start, end and completion by dates.
Starting a Review Configuration
- From the above table, you can click New or you could click on the New Review – Create a performance review dashboard panel.

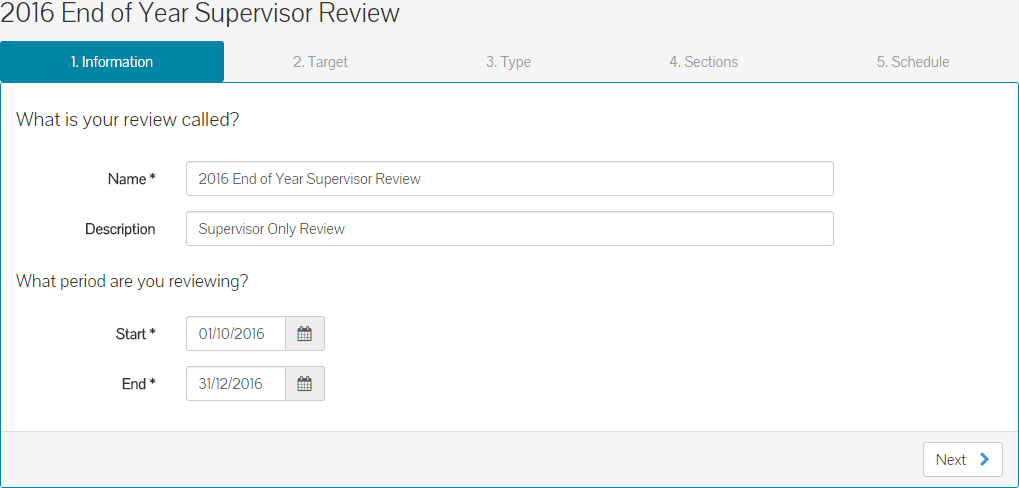
- Either method will take you to the new performance review configuration screen and the information tab of your new review.
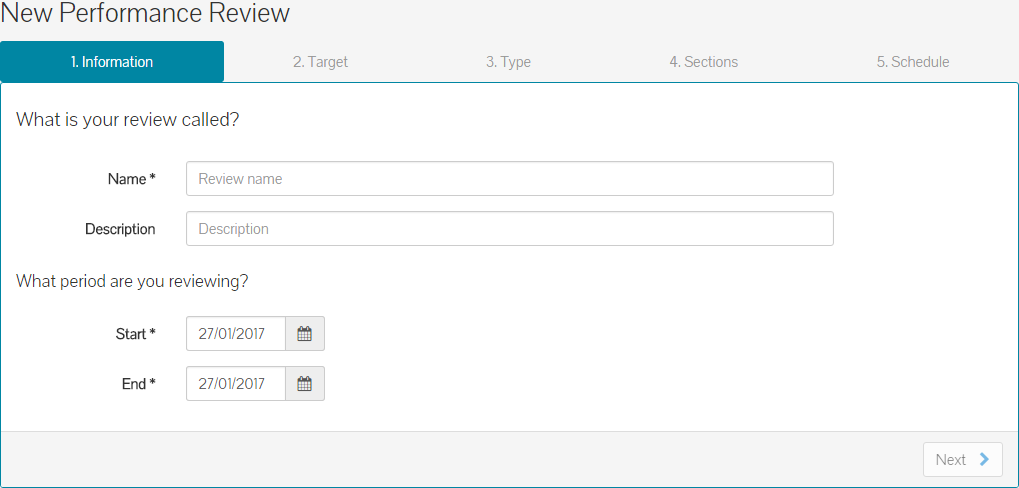
- Enter a name for the review, which could be something similar to ‘Q1 2016 Company Performance Review’.
- Enter a further detailed description of the review, but this is not required.
- Finally, enter the start and end dates for the review period. In this example, employees are being reviewed for performance across the first quarter of 2016. Therefore, the start and end dates will be – Start: 01/01/2016 and End: 31/03/2016.
- A completed information tab will look like the example below.
- Click next to move on to the Target tab.
- Note: At this stage, your review saved in draft format, meaning you can continue to complete this at a later stage.
Target (Who are you reviewing?)
- For Supervisor Only reviews, only the target options of Everyone and Target Groups apply. Target options are covered in Creating Reviews - Overview of Review Targets & Review Types article, available via the related articles at the bottom of this page.
- On the Target tab, you can choose between Everyone or Target Groups.
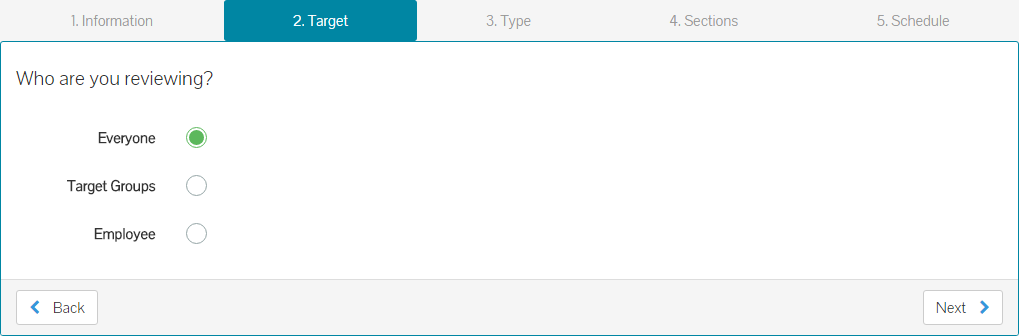
- By default, the Everyone radio button is selected, meaning this performance review is being configured for all employees with the Line Manager or Team Leader roles within the system.
- If you choose everyone, click next to move on to the Type tab.
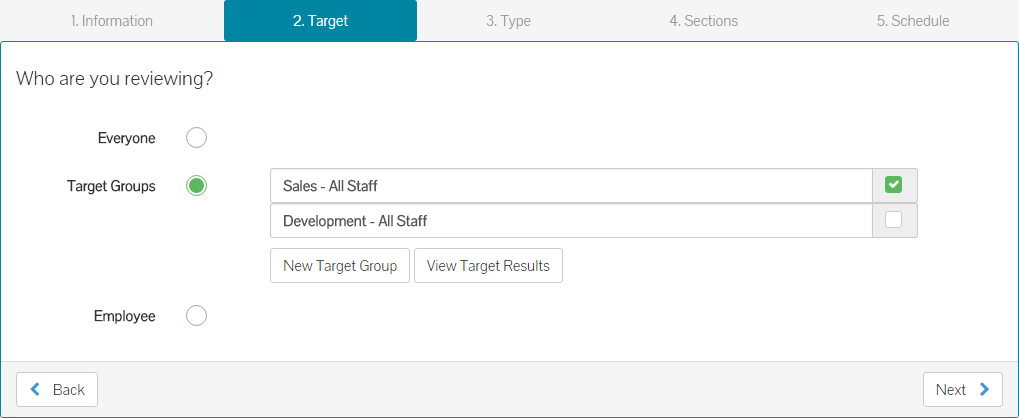
- If you choose Target Groups, you will either need to create a new Target Group, or select an existing group.

- Target groups allow you to create a performance review for specific teams or individuals. For example, your company policy might dictate that only employees who have past their probation period or have been with you longer than three months, need to complete a review. You could be required to create a review that is just for members of the Sales team or for employees who have a particular user role within MyPeople.
- Targeted groups will allow you to meet these requirements and conditions.
- To identify if an existing target group is suitable to use, check the box at the far right of the group name and then click on View Target Results.

- Should you need to create a target group, please follow the guides on creating, editing or deleting target groups at the bottom of this page.
- After creating a new group or using an already configured group, ensure the check box is ticked next to the group you will be using, before clicking next.
- Click next to move on to Type tab.
Type
- The Type tab will only show reviews types that you’re able to use with your selected Target(s). For example, if you choose Everyone from the Target tab, only Employee & Supervisor and Supervisor Only reviews, will be available. Review Targets and Types, are covered in greater detail in the ‘Creating Reviews – Overview of Review Targets & Review Types’ article, in the related articles section at the bottom of this page.
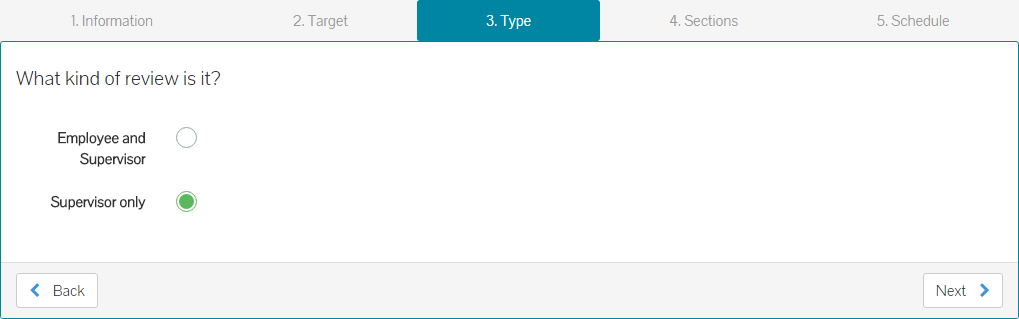
- Select the Type of review you wish to create, before clicking next to move on to the Sections tab.
Sections (What areas are you reviewing?)
- On the Sections tab, you can specify and configure the areas that this review will cover, select response types for how each question will be answered by the targeted supervisor’s and adjust weighting, if used.
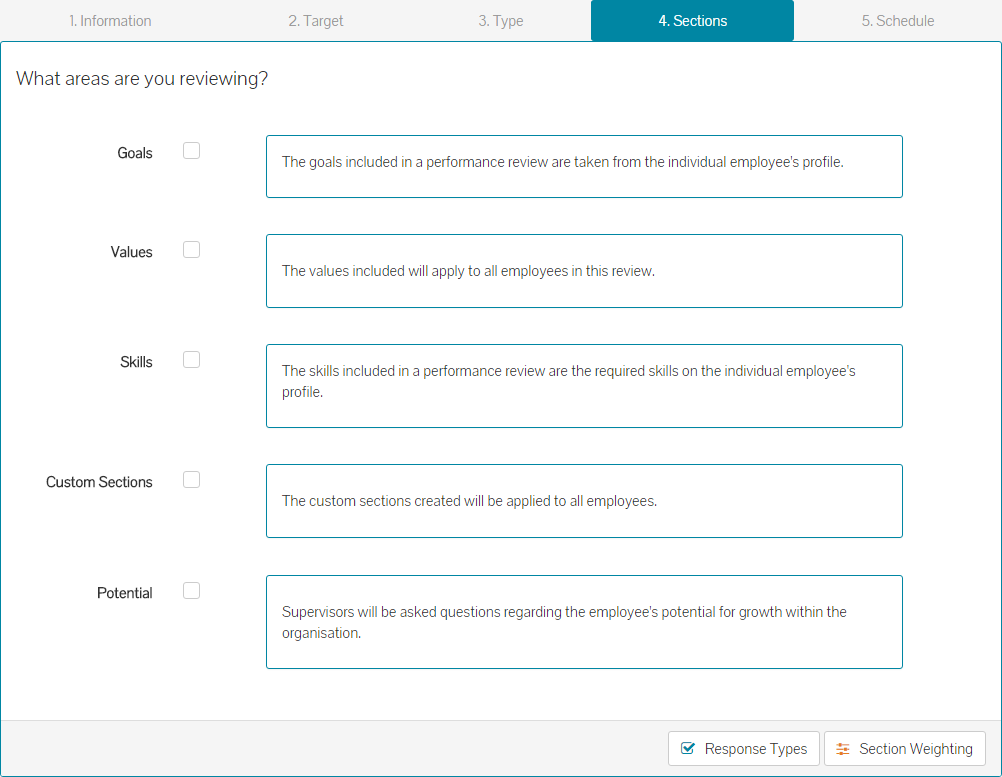
- By default, no selections have been made, as the performance review is completely configurable.
- If you do include Goals as a section to review, you can choose a response type from the drop-down menu, which is how supervisor’s will score each question about each goal and the scale of scores applied.
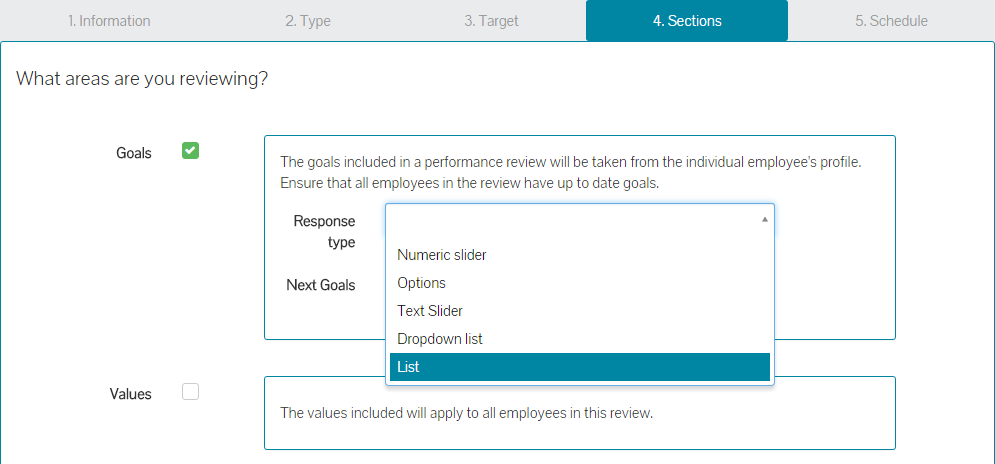
- Response types are covered in greater detail later in this article.
- You can also tick the box next to Next Goals, which will include a Next Goals section, at the end of the review, should you be configuring this type of review. This allows a supervisor to add, edit or remove goals for an employee, for the next period.
- The final sections of Values, Custom Sections and Potential are not selected by default. Tick the box next to any of these sections, to include and configure them accordingly.
Values Section
- If you’re including Values, you’ll need to have some company Values created in the system prior to this configuration. These are added under the Organisation side menu and Company Values sub-menu. Adding, editing and removing company values is covered in greater detail in the related articles below.
- When enabling the Values section, a list of your configured Company Values will be displayed.

- As you can see, the values are listed, but not currently selected to be included in this review. Tick the boxes next to some or all the company values, to include them in the review.
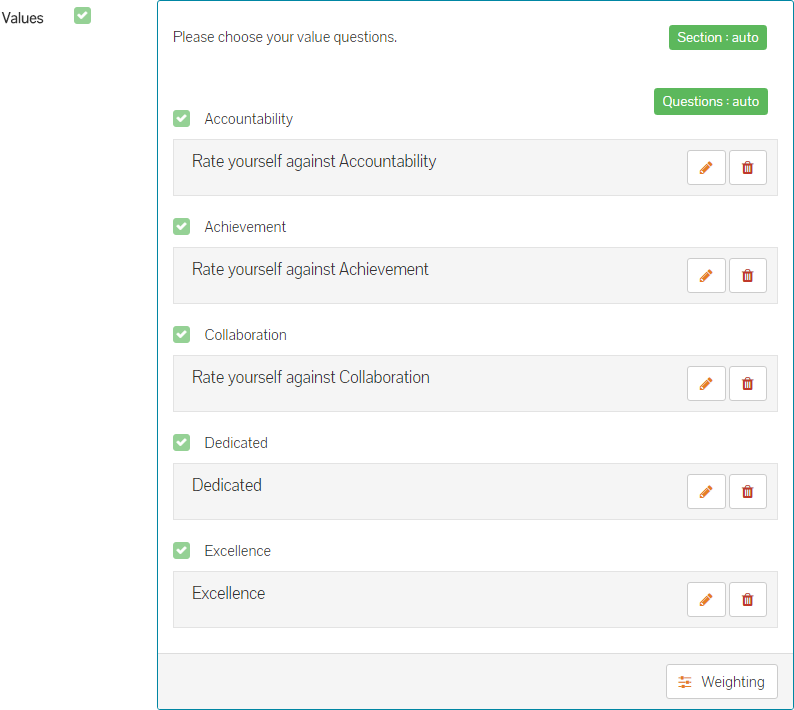
- A default question has been added to each value, but these can be edited or removed if required.
- By clicking on the pencil icon against each value, you can change the related question to one that you find more suitable in the on-screen form that is displayed.
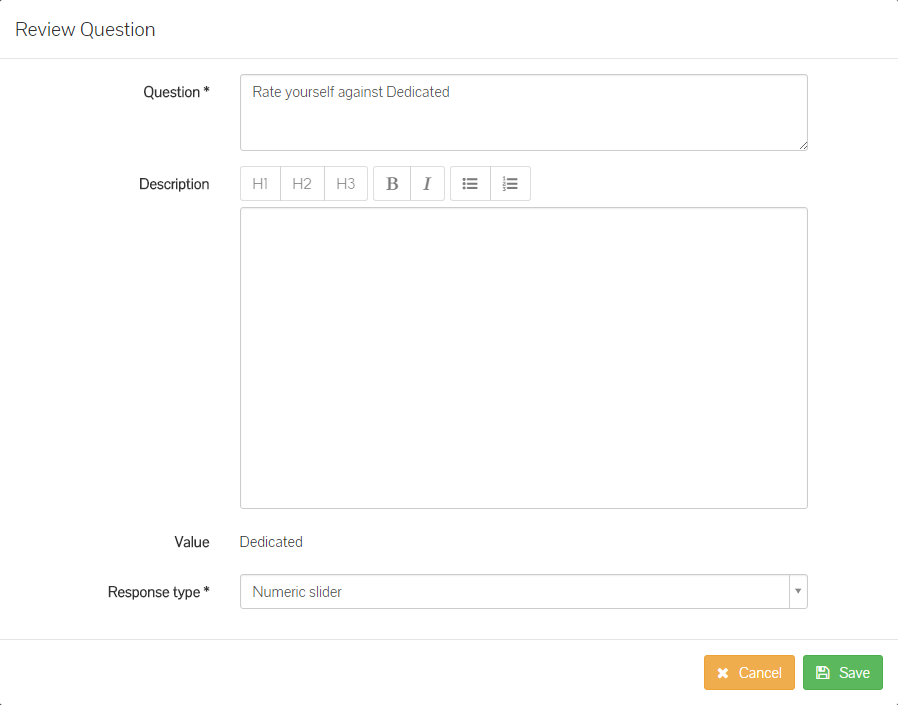
- Make the required changes to the question.
- You can also at this stage, choose to use a different response type for this question or any other question you are editing, by selecting a response type from the drop-down menu.
- Once your value question is updated and you have either left the default response type or selected a new one, click save.
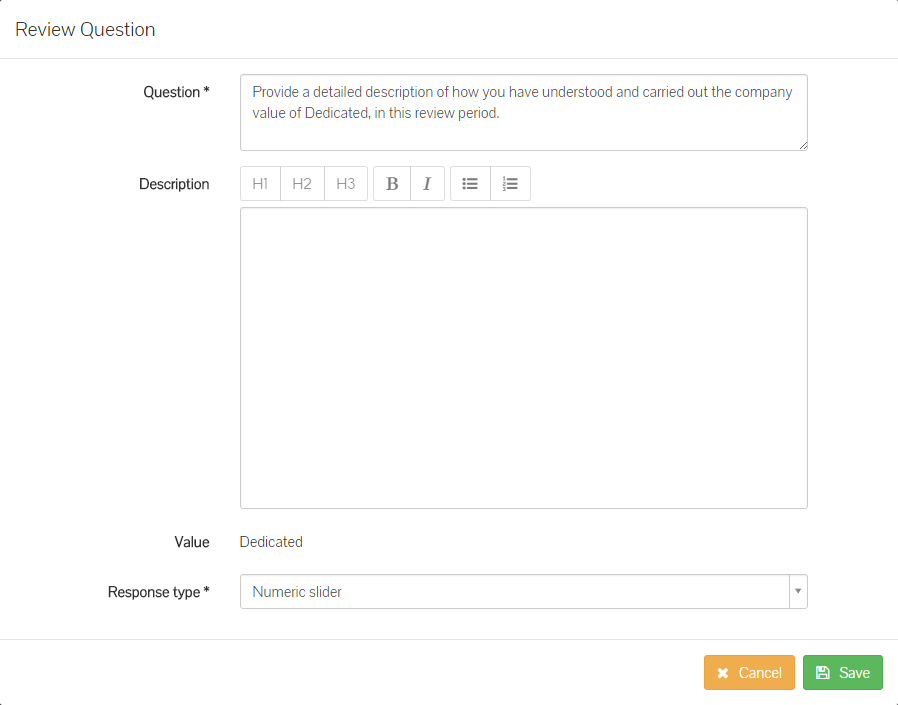
- The updated value question is shown in the Values section of the review configuration.
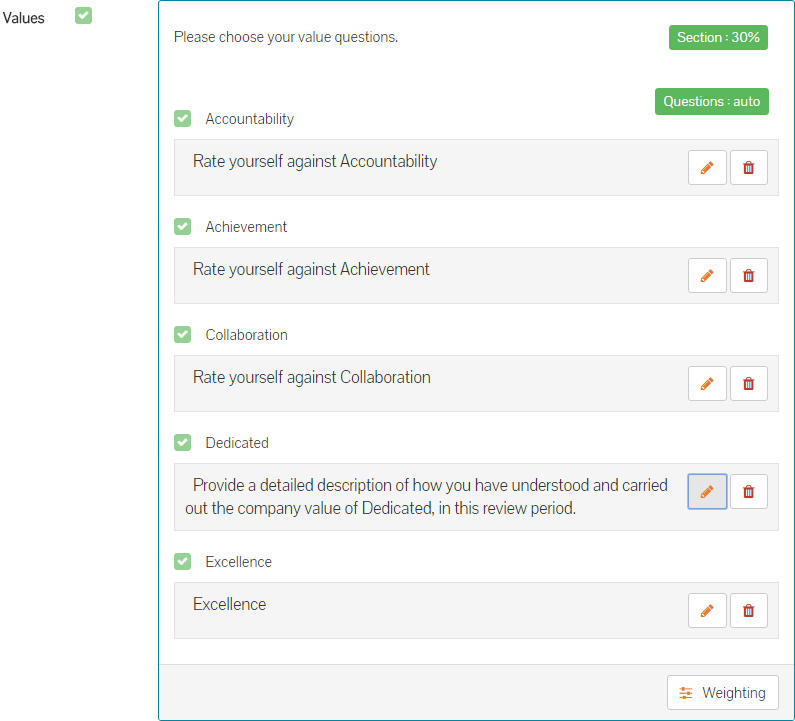
- Complete the same steps to edit additional Values and their corresponding questions.
- Lastly, you can adjust the weighting (if used) of the questions within the Values section, assigning more weight to a question/value, over the other questions/values in this section. This could be used if a question/value is more important to the company, team or individual being reviewed. Adjusting weighting is covered in greater detail later in this article.
Skills
- The Skills section allows for an employee’s required skills shown under their employee profile, to be reviewed. For example, the Development department may be required to have a certification in .Net programming. However, some employees within the Development department may not have had the time to complete the training and/or certification. Adding the Skills section in, will allow you to measure and score an employee against their progress of this or any other skill they are required to have.
- Including the Skills section by ticking the checkbox next to the Skills section, will allow you to configure the response type for this section.
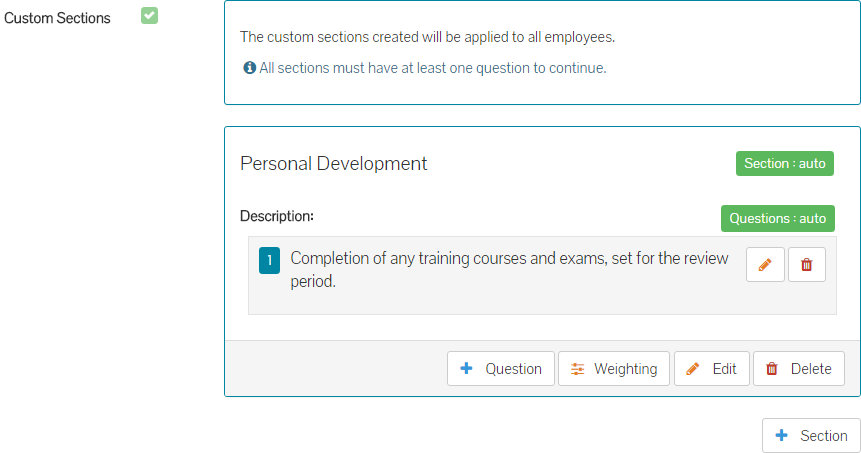
Custom Sections
- Custom sections allow you to add sections and questions that you’d like to review employees against, that aren’t covered under Goals, Values, Skills or Potential.
- For example, if you were running a company-wide review, you could add a section relating to Personal Development and add questions asking supervisors to review and score an employee’s progress against their personal development plans and training. Similarly, if you were running a review only for the Development department, a custom section and questions within this section, might be related to a customer project.
- To add a custom section, click the check-box next to Custom Sections to first enable the section.

- By enabling Custom Sections, you will see that a new + Section button is available. Click on this to add your first custom section.
- A Review Section form will be displayed on screen, to give your custom section a name and if necessary, a description.
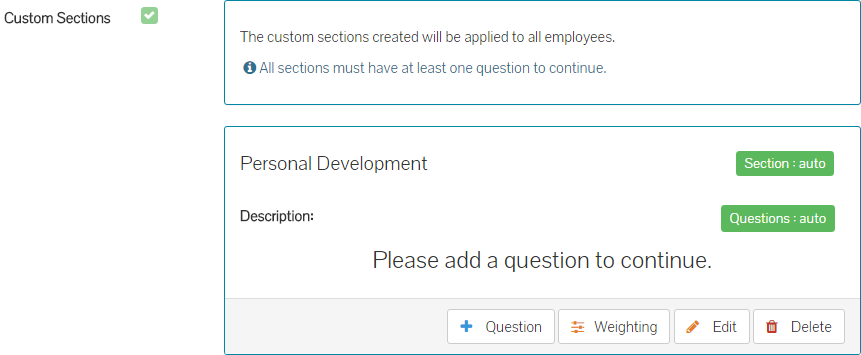
- Click save and the new section will be added to the review configuration.

- At this stage, you are required to add at least one question to the newly created section.
- Click the + Question button at the bottom of the new section and a review question screen will be displayed on-screen.
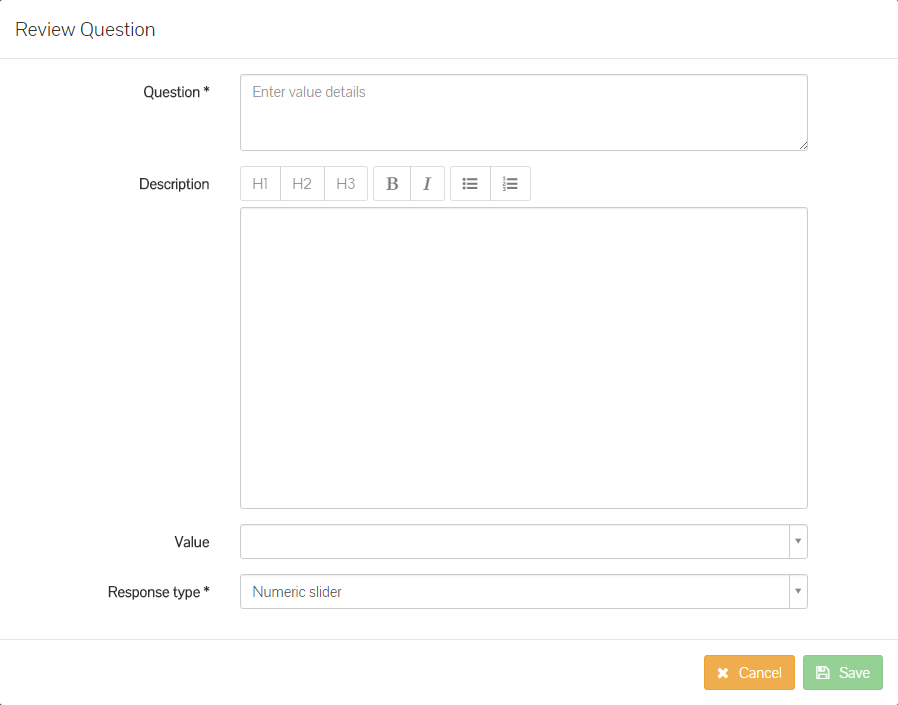
- Enter the question and a description if needed. Also, you can choose to link this question to a company value, as well as selecting a response type for the question. If you do not change the response type here, the question will adopt the default response type of numeric slider, which you may or may not want to use and could have edited as part of the Goals section above.
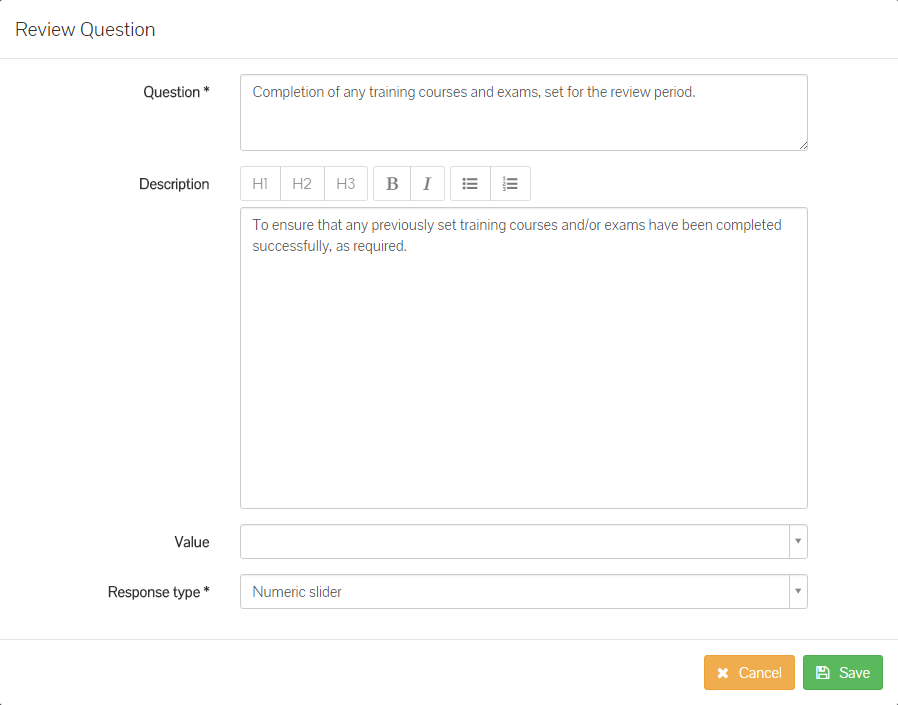
- A completed Review Question form will look similar to the below example.
- Click save and your new question will be added to the newly created section.
- You could now add additional questions to the new section, as well as adding other sections with questions.
- You can also adjust the weighting of the questions within the custom section, by clicking the Weighting button within the newly created section. One of the questions may be more important than the others, therefore needing a greater weight. This will however, contribute to more or less of the overall review score, depending on the final score for this question.
Potential
- Lastly, you have the option to include Potential.

- Potential measures an employee against Hard Skills, Soft Skills and Motivation across a score of 1 – 5 for each.
- Hard Skills measured are:
- The employee could perform at a higher level or taken on increased responsibilities within the next year.
- The employee could learn the additional skills and competencies needed to perform at a higher level.
- Soft Skills measured are:
- The employee demonstrates leadership abilities by showing initiative, delivering on promised results and taking appropriate risks.
- The employee demonstrates strong communication skills and interacts well with all levels of the organisation.
- Motivation measures:
- The employee demonstrates the flexibility and motivation to move to a higher level.
- The employee welcomes opportunities for learning and development.
- Potential is only available for a supervisor/manager to complete.
- Combined with performance review scores, potential scores help identify talent and similarly identify any areas where improvement may be needed.
- These are reflected under the company insight reports, which can be accessed by clicking the Reporting side menu, followed by the Company sub-menu. Finally, click Talent on the company reports page, which shows Potential against Performance and plots each employee in to the grid.
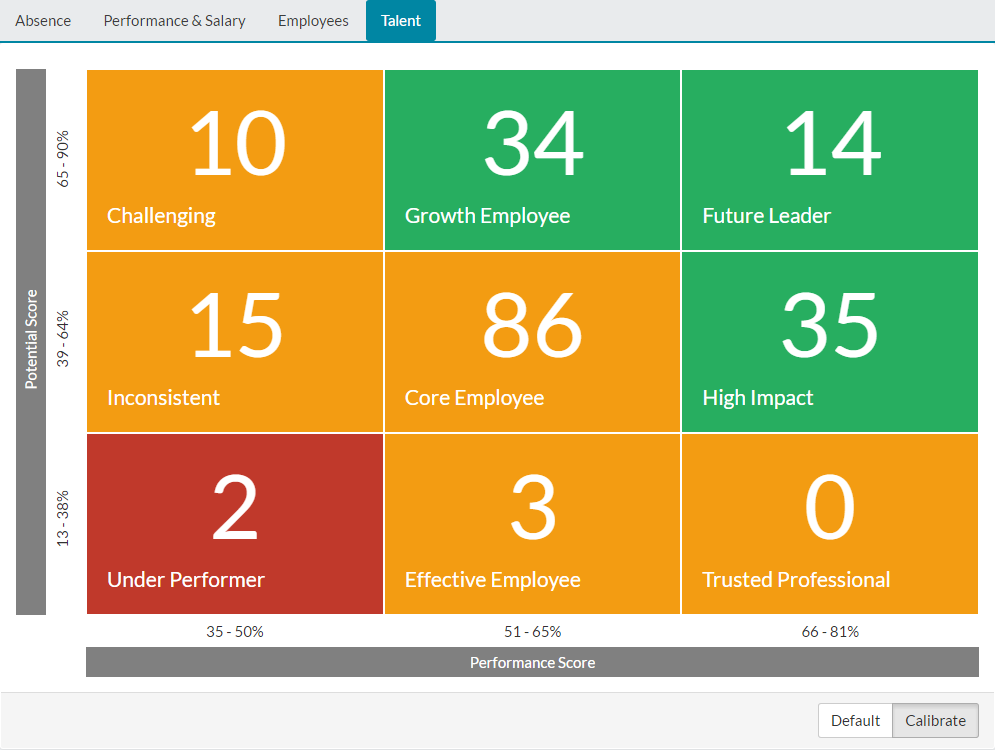
- For further information on the Talent report, please refer to the related articles at the bottom of this page.
Response Types
- Response options are the method in which questions are answered within the performance review.
- The options are: Dropdown list, List, Numeric Slider, Options and Text slider. Those are the styles of the responses. For example, if you use the default option of ‘Drop-down list’, employees completing this review will need to select an answer from the drop-down list when answering each question within the review.
- To understand how each response type will look and to edit the number or scale of the responses, click on Response Types at the bottom of the sections page.
- The response configuration page will be displayed, where you can look at the response types available, try them out in a preview area, edit existing responses or add more if required. The responses added will apply to all sections where the chosen response type is used.
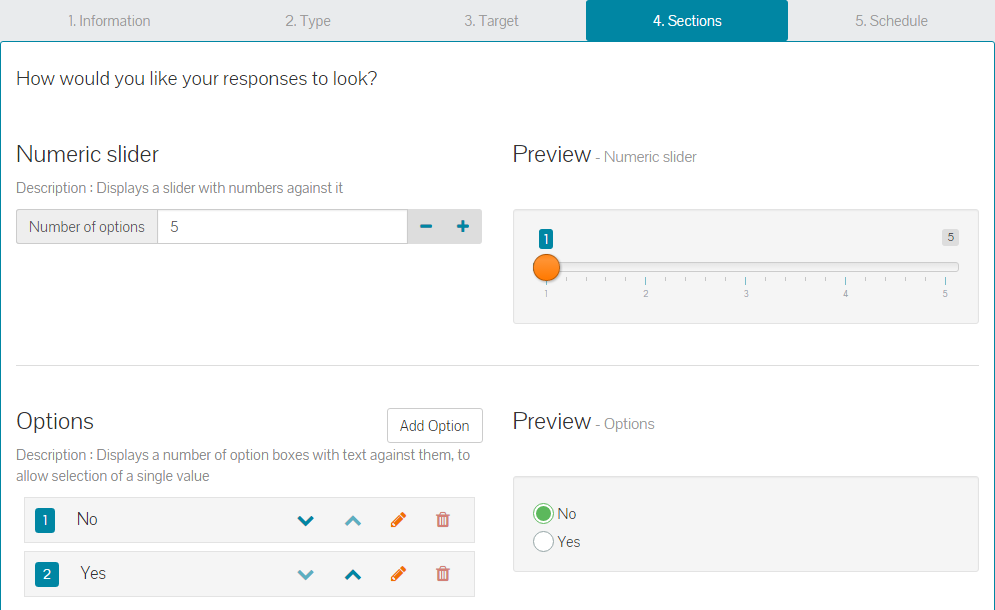
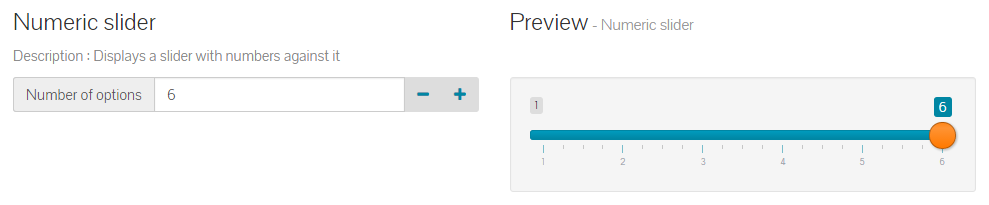
- There are a couple of methods for making changes to response types. For example, for the Numeric slider response type, you can click the + or – symbols to increase or decrease the number of options available, as shown below.
- For all other response types, to add additional response types, click the Add Option button next to the response type name. This enables an additional field to enter a new response.
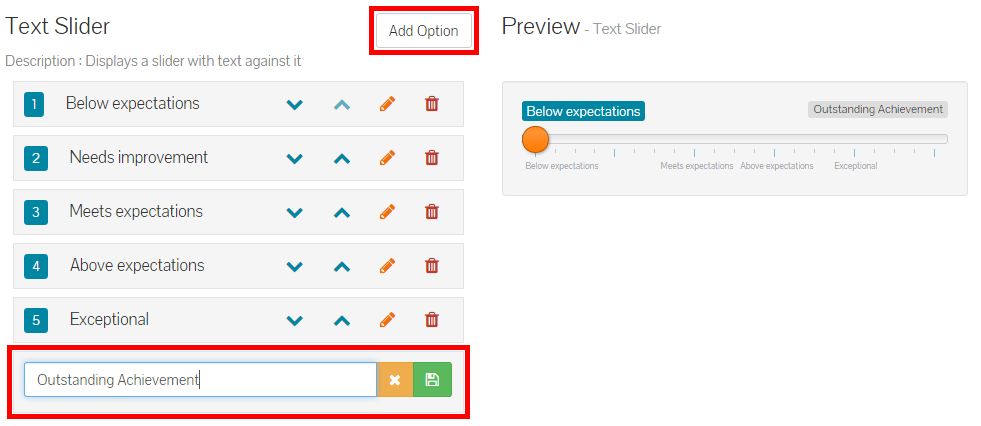
- Add any additional response and click the save icon, represented by a green disk icon. The new response is then shown in the list, as well as being available on the preview area.
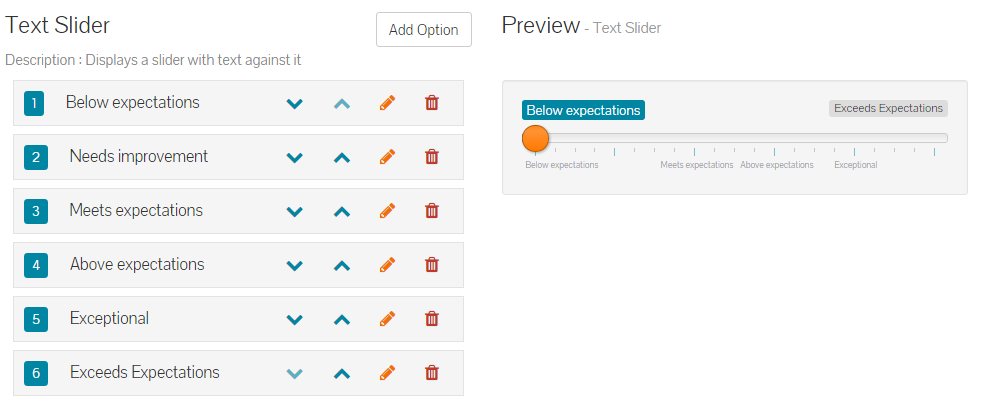
- You may also wish to edit one of the existing response options listed. You can do this by clicking the pencil icon next to the response text.

- This open the response text for editing.

- Make the required change, before clicking the save icon.

- The updated text is now saved and also available in the preview area.
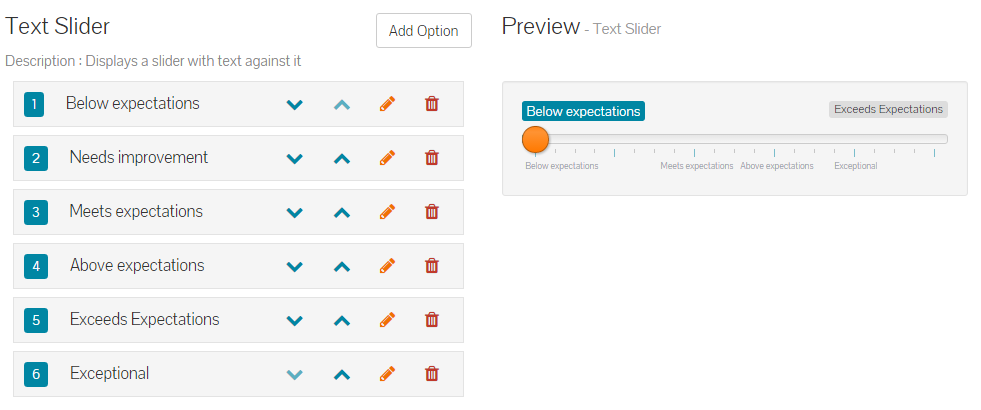
- Lastly, you may wish to change the order of the responses. By clicking the up and down arrows next to each response, you can re-order them in the list. For example, you might be happy with the response text, but may want to have Exceptional after Exceeds Expectations in the example above.
- Clicking either the down arrow next to Exceptional or the Up arrow next to Exceeds Expectations, would achieve the desired order, as shown below.
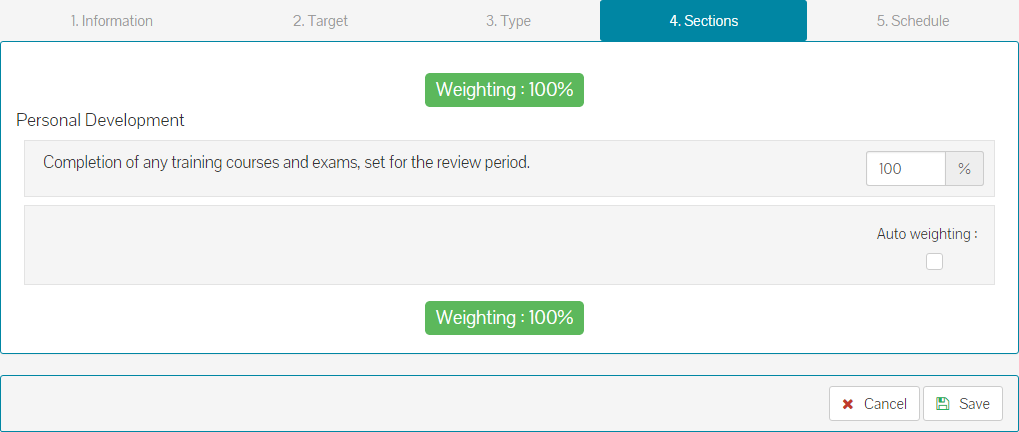
Section Weighting
- Weighing can either be left to the default setting of auto, which means all sections and questions will have an evenly distributed weight.
- However, you may wish to add manually configured weighting, to make a section or question more important than the others.
- Adjusting weighting can be completed against individual questions within each section, an/or applied to the section itself.
- By clicking on the Section Weighting button, you’ll be taken to the Weighting screen, whereby you can configure weighting for the sections within this review.

- You may wish to make the Goals section a heavier weight than any other section in the review, whereby you add this with a percentage of 50%, then 30% for the Values section, and 10% for Skills and Personal Development section. This indicates to all, that the Goals and Value sections are more important that the Skills and Personal Development sections in this review.
- Please note, heavier weighted sections will result in very different performance review scores. For example, scoring an employee high on an automatically distributed weighting pattern, will result in less of the overall review score, compared to that of scoring an employee high for a heavier weighted section, which will result in a higher score on the review. Similarly, scoring employees low against a heavier weighted section, will result in a lower overall score than those scoring low against a section with automatic weighting.
- By removing the tick from the auto weighting checkbox, you can set manual weighting.
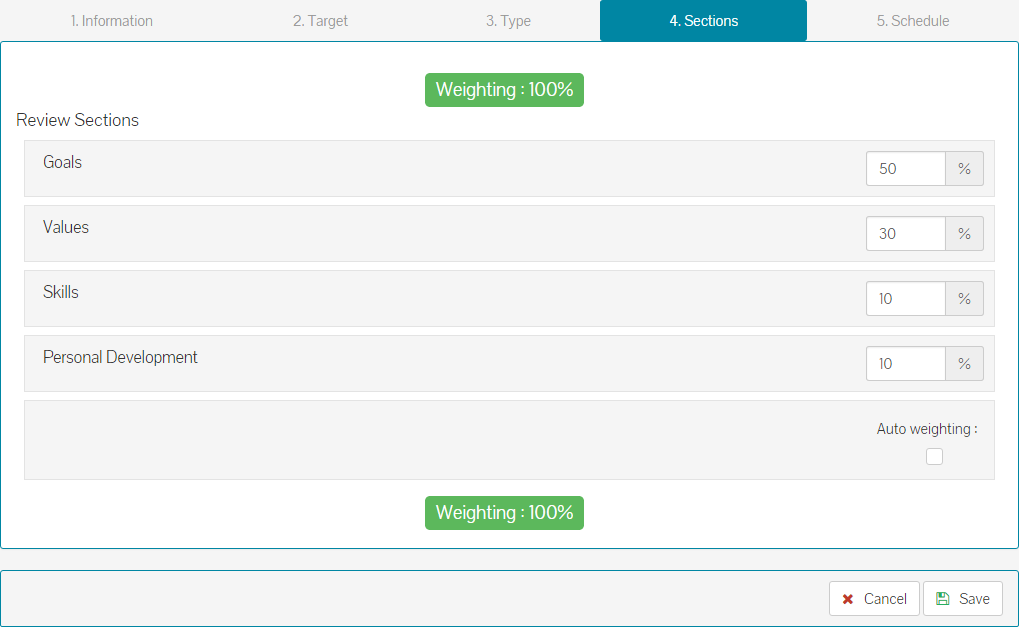
- In the example above, the weighting has been adjusted to add more weight to the Goals & Values sections and less to the Skills and Personal Development sections. Click Save to confirm your weighting changes.
Schedule
- On the schedule tab, you can set the date when the review starts, when it should be complete by and if to send notifications.
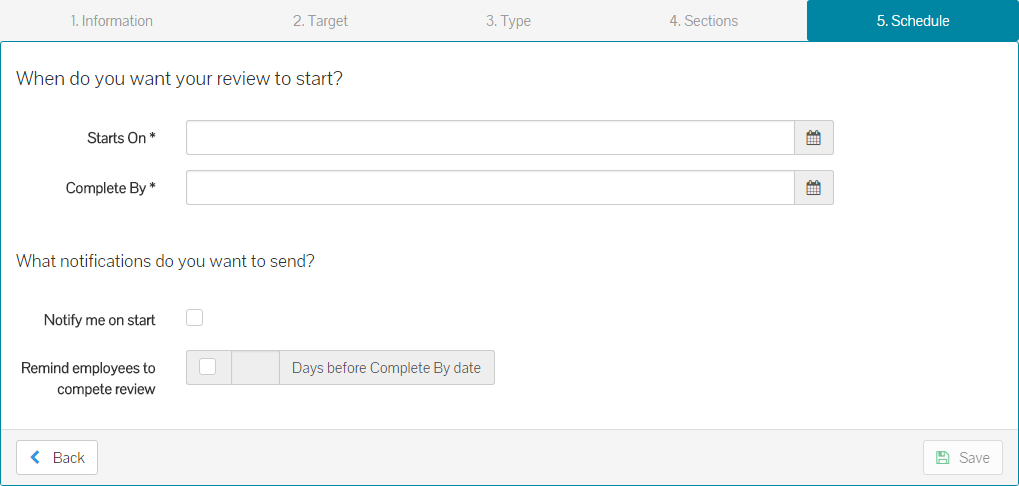
- Enter a date when you’d like the review to start and when the review should be complete by, by all or targeted employees.
- You can choose to send yourself a notification, should the date be further in the future, to remind you that the review is starting.
- Lastly, you can choose to send a reminder email, to those employees who have not completed their review, X amount of days before the complete by date set earlier.
- A completed Schedule tab will look like the example below.
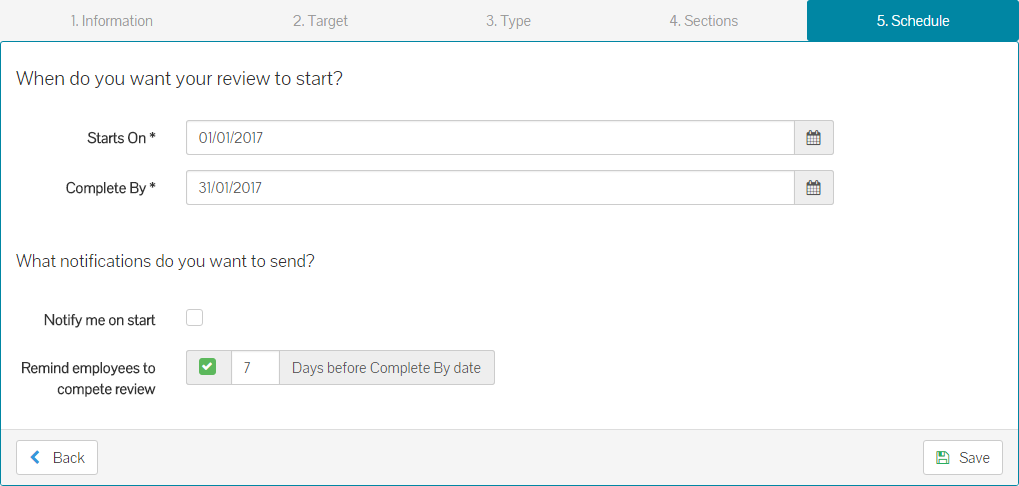
- Click save to submit your review to be scheduled.
- The review will run on the specified ‘Starts On’ date and those employees/supervisors targeted, will be notified to complete the review.
Was this article helpful?
That’s Great!
Thank you for your feedback
Sorry! We couldn't be helpful
Thank you for your feedback
Feedback sent
We appreciate your effort and will try to fix the article